![Ritten/Renon](https://res.cloudinary.com/tota2k22/image/upload/c_fill,w_100,h_100,q_80,g_faces,f_auto/Renon.jpg 100w, https://res.cloudinary.com/tota2k22/image/upload/c_fill,w_200,h_200,q_80,g_faces,f_auto/Renon.jpg 200w, https://res.cloudinary.com/tota2k22/image/upload/c_fill,w_300,h_300,q_80,g_faces,f_auto/Renon.jpg 300w, https://res.cloudinary.com/tota2k22/image/upload/c_fill,w_400,h_400,q_80,g_faces,f_auto/Renon.jpg 400w, https://res.cloudinary.com/tota2k22/image/upload/c_fill,w_500,h_500,q_80,g_faces,f_auto/Renon.jpg 500w, https://res.cloudinary.com/tota2k22/image/upload/c_fill,w_600,h_600,q_80,g_faces,f_auto/Renon.jpg 600w, https://res.cloudinary.com/tota2k22/image/upload/c_fill,w_700,h_700,q_80,g_faces,f_auto/Renon.jpg 700w)
Departure
Ritten/Renon
Discover more![Brentonico San Valentino](https://res.cloudinary.com/tota2k22/image/upload/c_fill,w_100,h_100,q_80,g_faces,f_auto/Brentonico.jpg 100w, https://res.cloudinary.com/tota2k22/image/upload/c_fill,w_200,h_200,q_80,g_faces,f_auto/Brentonico.jpg 200w, https://res.cloudinary.com/tota2k22/image/upload/c_fill,w_300,h_300,q_80,g_faces,f_auto/Brentonico.jpg 300w, https://res.cloudinary.com/tota2k22/image/upload/c_fill,w_400,h_400,q_80,g_faces,f_auto/Brentonico.jpg 400w, https://res.cloudinary.com/tota2k22/image/upload/c_fill,w_500,h_500,q_80,g_faces,f_auto/Brentonico.jpg 500w, https://res.cloudinary.com/tota2k22/image/upload/c_fill,w_600,h_600,q_80,g_faces,f_auto/Brentonico.jpg 600w, https://res.cloudinary.com/tota2k22/image/upload/c_fill,w_700,h_700,q_80,g_faces,f_auto/Brentonico.jpg 700w)
Arrival
Brentonico San Valentino
Discover more
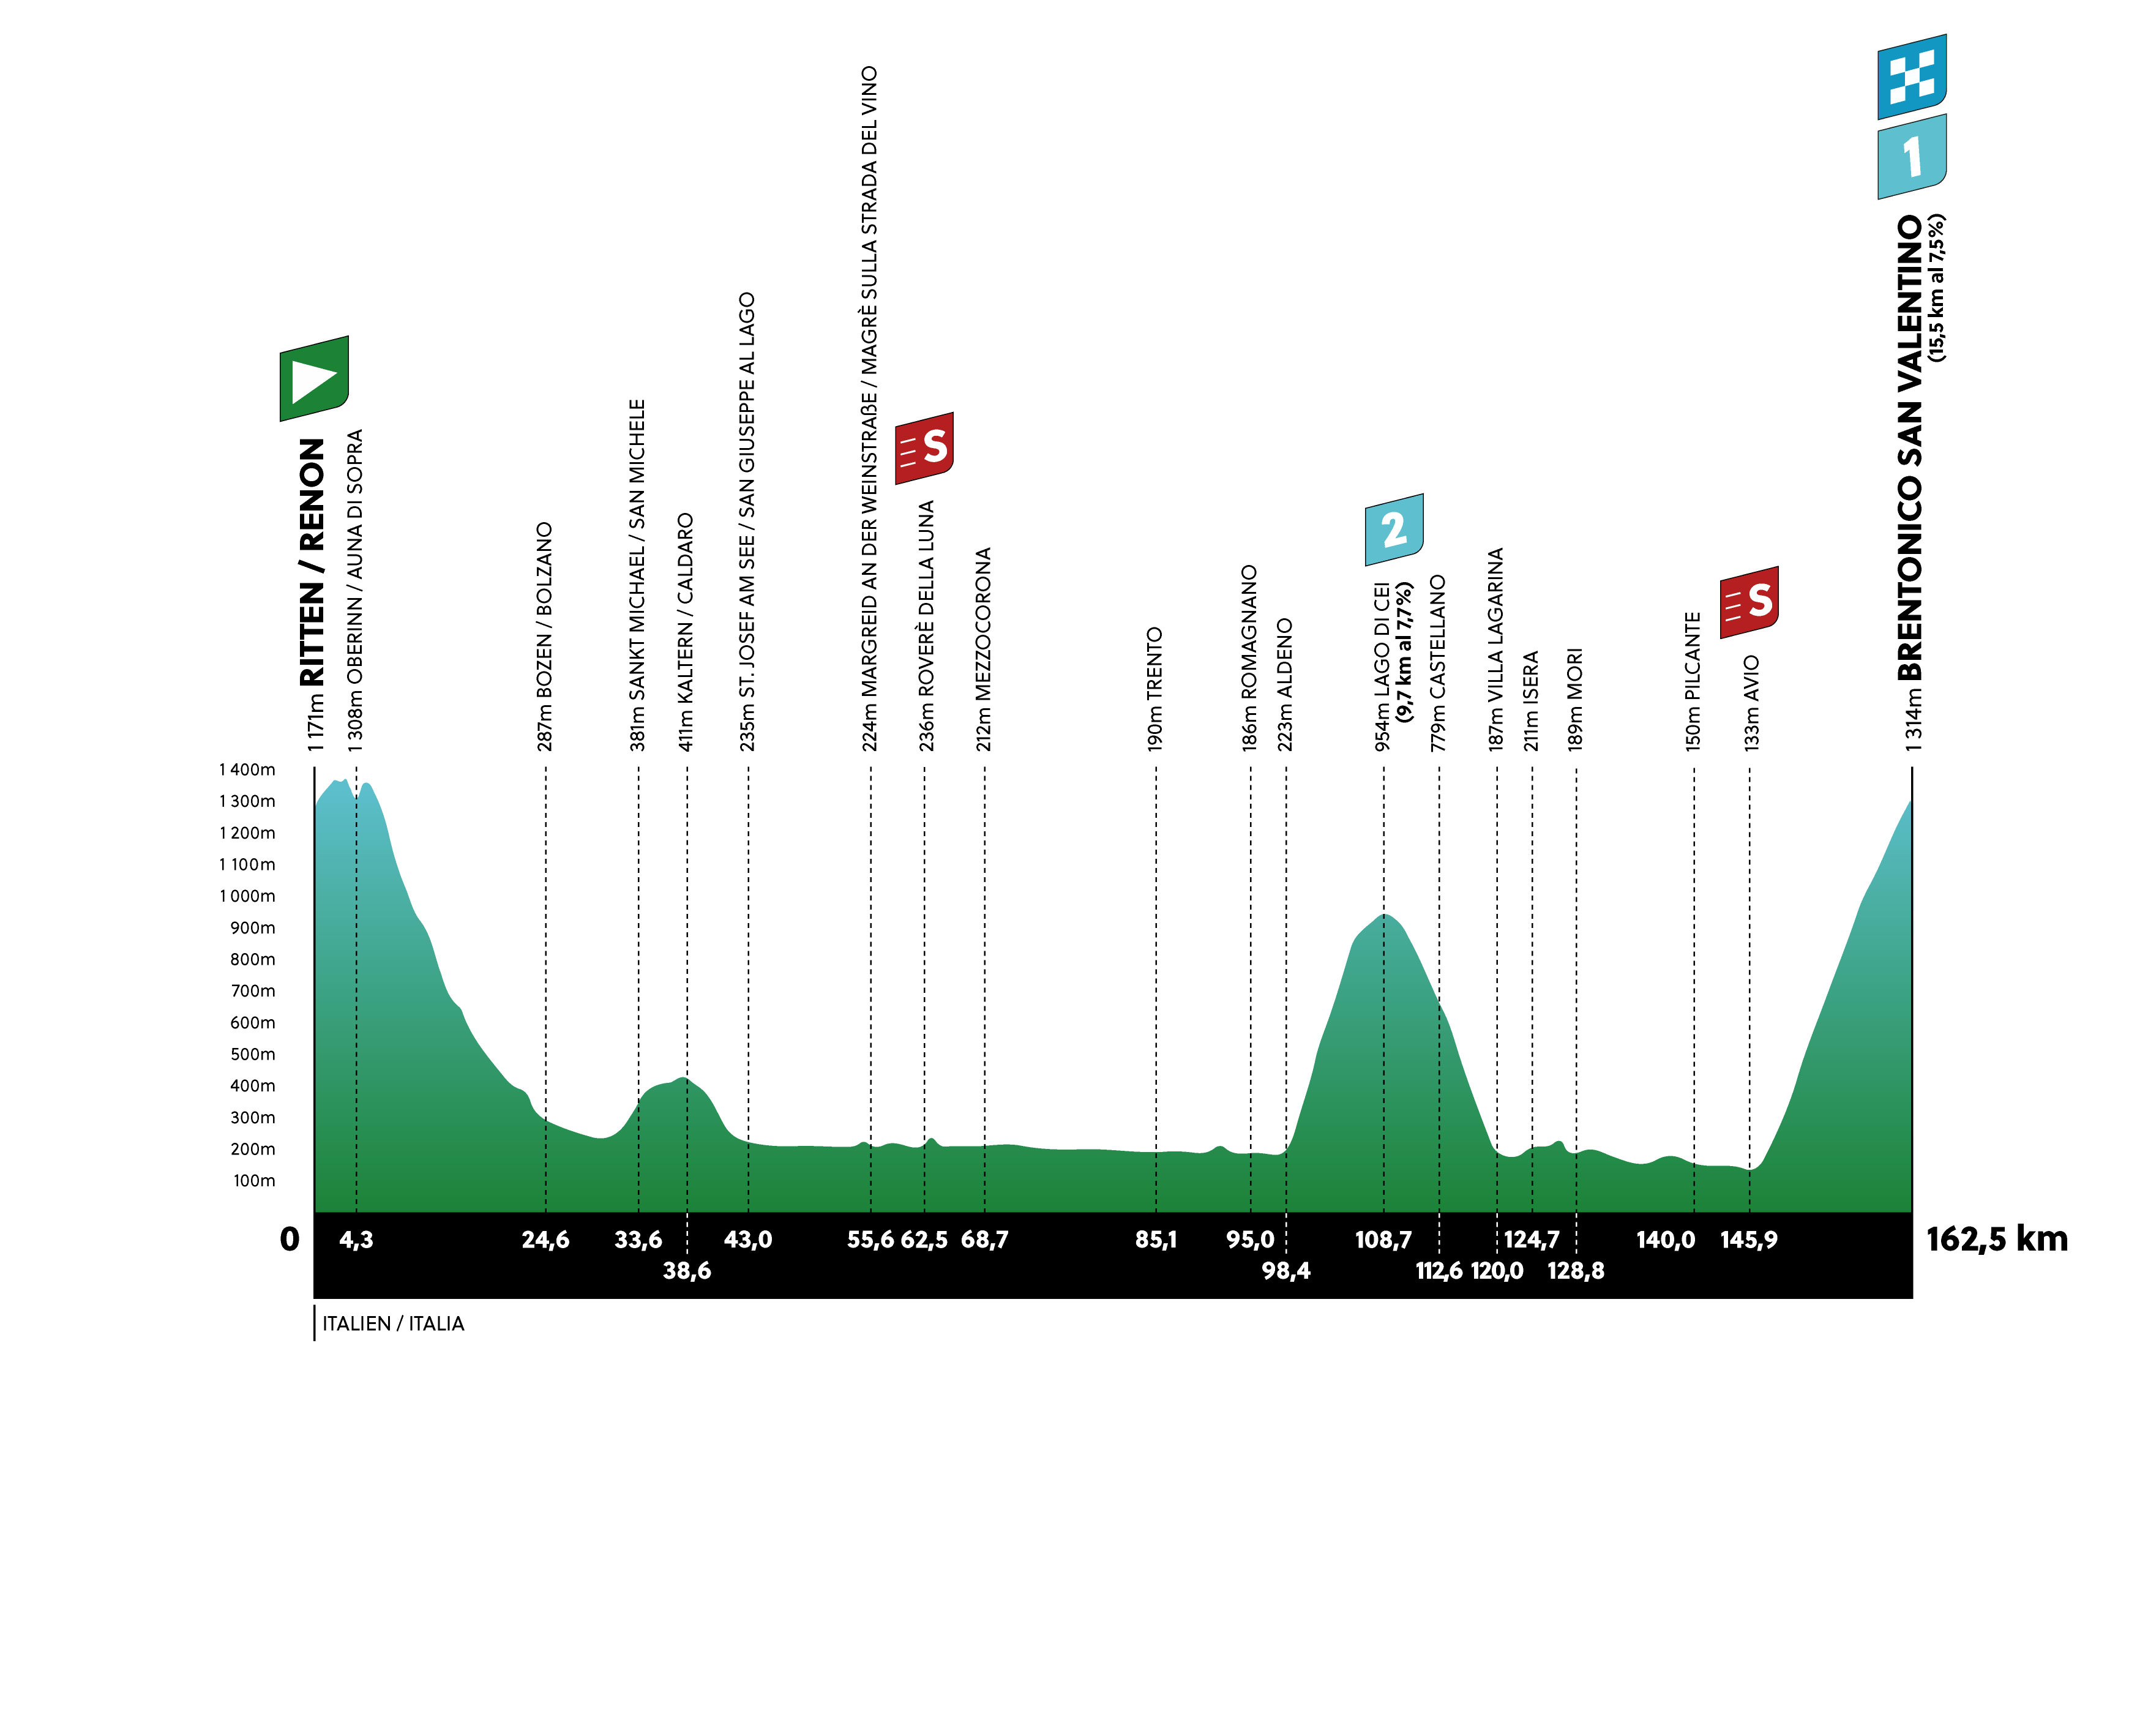
Right after a few kilometres of uphill from the neutral start in Ritten/Renon, perfect for warming up the legs, there is a long initial downhill also featuring several tunnels in its second part, along a wide and straight road, which will lead through the city of Bozen/Bolzano. Leaving the city, the route climbs gently towards Kaltern/Caldaro, to then find a long flat stretch winding through the apple orchards and vineyards of the Adige Valley, on the way to Trento, crossed via the four-lane outer city road.
Once in Aldeno, almost 100 km into the stage, the first real ascent of the day will begin, peaking at the KOM by Cei Lake, after about 10 km of demanding but regular climbing. This will be followed by a fast descent and another 25 km of almost flat terrain to reach Avio, where the long and demanding final climb will be tackled: slightly over 15 km of steady ascent to the finish line in San Valentino di Brentonico.
![](https://res.cloudinary.com/tota2k22/image/upload/c_fill,w_200,q_80,f_auto/CRONOTABELLE-TOTA3-1.jpg 200w, https://res.cloudinary.com/tota2k22/image/upload/c_fill,w_300,q_80,f_auto/CRONOTABELLE-TOTA3-1.jpg 300w, https://res.cloudinary.com/tota2k22/image/upload/c_fill,w_400,q_80,f_auto/CRONOTABELLE-TOTA3-1.jpg 400w, https://res.cloudinary.com/tota2k22/image/upload/c_fill,w_500,q_80,f_auto/CRONOTABELLE-TOTA3-1.jpg 500w, https://res.cloudinary.com/tota2k22/image/upload/c_fill,w_600,q_80,f_auto/CRONOTABELLE-TOTA3-1.jpg 600w, https://res.cloudinary.com/tota2k22/image/upload/c_fill,w_700,q_80,f_auto/CRONOTABELLE-TOTA3-1.jpg 700w, https://res.cloudinary.com/tota2k22/image/upload/c_fill,w_800,q_80,f_auto/CRONOTABELLE-TOTA3-1.jpg 800w, https://res.cloudinary.com/tota2k22/image/upload/c_fill,w_900,q_80,f_auto/CRONOTABELLE-TOTA3-1.jpg 900w, https://res.cloudinary.com/tota2k22/image/upload/c_fill,w_1000,q_80,f_auto/CRONOTABELLE-TOTA3-1.jpg 1000w, https://res.cloudinary.com/tota2k22/image/upload/c_fill,w_1100,q_80,f_auto/CRONOTABELLE-TOTA3-1.jpg 1100w, https://res.cloudinary.com/tota2k22/image/upload/c_fill,w_1200,q_80,f_auto/CRONOTABELLE-TOTA3-1.jpg 1200w, https://res.cloudinary.com/tota2k22/image/upload/c_fill,w_1400,q_80,f_auto/CRONOTABELLE-TOTA3-1.jpg 1400w, https://res.cloudinary.com/tota2k22/image/upload/c_fill,w_1600,q_80,f_auto/CRONOTABELLE-TOTA3-1.jpg 1600w, https://res.cloudinary.com/tota2k22/image/upload/c_fill,w_1800,q_80,f_auto/CRONOTABELLE-TOTA3-1.jpg 1800w, https://res.cloudinary.com/tota2k22/image/upload/c_fill,w_2000,q_80,f_auto/CRONOTABELLE-TOTA3-1.jpg 2000w, https://res.cloudinary.com/tota2k22/image/upload/c_fill,w_2400,q_80,f_auto/CRONOTABELLE-TOTA3-1.jpg 2400w, https://res.cloudinary.com/tota2k22/image/upload/c_fill,w_2800,q_80,f_auto/CRONOTABELLE-TOTA3-1.jpg 2800w, https://res.cloudinary.com/tota2k22/image/upload/c_fill,w_3200,q_80,f_auto/CRONOTABELLE-TOTA3-1.jpg 3200w, https://res.cloudinary.com/tota2k22/image/upload/c_fill,w_3600,q_80,f_auto/CRONOTABELLE-TOTA3-1.jpg 3600w, https://res.cloudinary.com/tota2k22/image/upload/c_fill,w_4000,q_80,f_auto/CRONOTABELLE-TOTA3-1.jpg 4000w)